I’ve been running Windows 7 Release Candidate 1 for several weeks now and I think I’m finally able to start talking about the things I like. Before I do that however I figure it’s only fair to first talk about how all you groovyReaders out there can easily install Windows 7 risk free so you can not only read about Windows 7 but actually ENJOY it as well! So, to keep things simple, what I’m going to do is show you the EASIEST way to install Windows 7 Release Candidate to test and play with while at the same time not messing with your current Windows Install – even if you have only 1 hard drive in your computer. This is called a DUAL BOOT config. But essentially I’m going to show you how to use the native VHD support in Windows 7 to boot a physical machine. I’ll explain more below.
Let’s get started! Note – In order to create a Dual-Boot Install of Windows 7, you will need at least 20 GB of free space on one of your Hard Drives in your system.
- Download Windows 7 RC. FYI – For most computers and applications, you should probably just download the 32-Bit Version for now. If your computer is ~6-12 months old, this would be a good time to try out a 64-bit version.
During the download process you will be prompted for your Windows Live ID. If you have a hotmail account just use that. Otherwise just create a Live ID and you will be provided a product key for Windows 7 RC 1. 2. Once the download completes, burn the .ISO file to a DVD and reboot with the DVD in the drive so that you will boot from the DVD drive. 3. Press Shift + F10 when the Install Windows screen appears (as shown below.)
Now we’re going to build a virtual hard drive (.VHD) on your physical hard drive. 4. Type diskpart in the Command Window
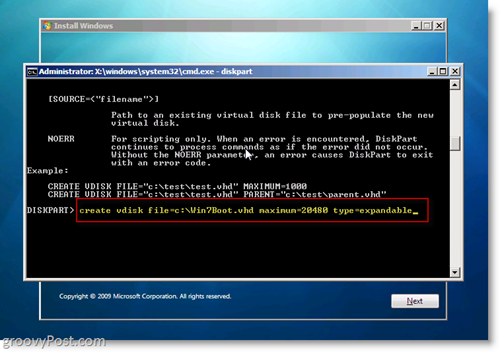
5. Type create vdisk file=c:win7boot.vhd maximum=20480 type=expandable and Press Enter
The only thing you might want to customize in Step 5 is the setting “maximum=20480”. This setting controls the size of the Virtual Hard drive Windows 7 will be using. 20480 = 20 Gigs which should be plenty for testing and installing a few applications. If you have the drive space, you might want to increase this to 40960. One thing to note, once Windows 7 is running, you will have access to the other drives on the system so you can reserve the Virtual disk for the OS only and all apps can be installed on the Physical disk or USB drive etc. 6. Type Select vdisk file=c:win7boot.vhd and Press Enter
7. Type Attach vdisk and Press Enter
8. Type Exit and Press Enter
At this point what you’ve done is Create a Virtual Disk on the C: drive of your hard drive and attached it so that the Windows 7 Installer will see it when you install it. If you want to take a look at your handy work, Type Dir c: and Press Enter
Ok so now were READY to start the Windows 7 install using the .VHD virtual drive! 9. In the Command (cmd.exe) Window, Type Exit to close the Command Window then Click Next in the Windows 7 Install Window
10. Click Install Now Button
11. Check “I accept the license terms” Radio Box and Click Next
12. Click Custom (Advanced)
13. Click the Disk with Unallocated Space which matches the drive size you created in Step 5. In my example I created a 20 GB (GigaByte) hard drive which is shown below as Disk 1. This is my .VHD Virtual Drive I will be Dual Booting onto. Once selected, Click Next Note: You can ignore the Windows Error “ Windows cannot be installed to this disk”
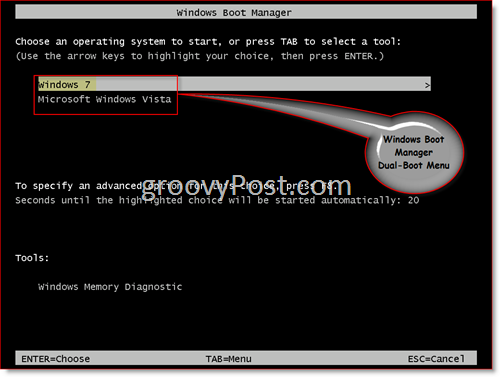
ALL DONE! Windows should now begin the install using the .VHD file you created on your System C Drive to build the Windows 7 Install as shown in the screen shot to the right. Once the install completes and you reboot your computer, the Windows Boot manager will give you the option to Boot from your original Operating System OR, boot Windows 7 natively from the .VHD file you created and installed Windows 7 in. VERY GROOVY!!
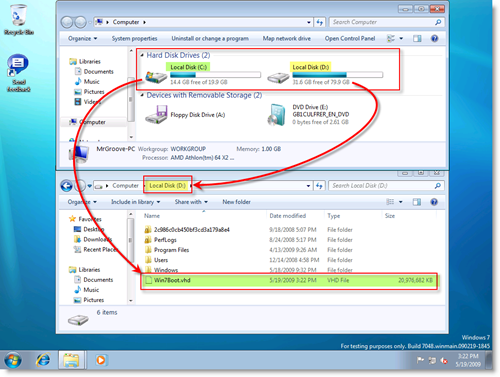
Now take a look at this screen shot. This is REALLY cool. After you boot into your Windows 7 machine, you will notice you can see ALL your Physical drives. In fact, if you look on the Physical disk where you stored the .VHD (Virtual Hard Disk) you will see the .VHD file that Windows 7 is installed in! In my example below the C: is my System Drive where Windows 7 is installed on, and the D Drive is my Physical Disk. See the Win7Boot.VHD file? That’s my C: Drive. Groovy ehh!! (and a bit mind blowing)…
Make sense? Questions? Let me know here or in the Forum! Tags: windows-7, install, vhd, dual-boot, diskpart, rc, release, candidate, virtual-hard-drive just one question, how do I make windows 7 my default OS when dual-booting? each time I reboot I have to arrow up and select windows 7 instead of vista…?
- Boot from the Windows 7 disk. 2. Press Shift + F10 when the Install Windows screen appears. 3. Type “bcdedit /v” (without quotes) (eg: x:\sources bcdedit /v). 4. Look for the for the “device” entry that has “c:\win7boot.vhd” (to make sure you have the right entry, you can look under the “Description” entry and it should say “Windows 7”). 5. Above the “device” entry will be an “identifier” entry. 6. Copy this identifier ({xxxx-xxxx-xxxx-xxxx} by right clicking on the blue portion of the window (at the top) and select “Edit->” and select “Mark”. Left mouse click on the beginning of the identifier and drag to the right (it will become highlighted). 7. Press “Enter” on your keyboard to copy. 8. Type “bcdedit /delete {identifier}” (WITHOUT quotes, so it will look like: x:\sources bcdedit /delete {xxxx-xxxx-xxxx-xxxx}. To paste the identifier go to the blue portion of the window, right click, “Edit->” and click “Paste”). 9. Press enter and you should get a success message. 10. To make sure it deleted the entry, type “bcdedit /v” and the entire Windows 7 boot entry should be gone ( the only OS***** entry that will show up will be your secondary (or primary) OS.) 11. Type exit to get out of cmd prompt. 12. Press the esc button and select “Yes” when the dialog box shows up. 13. You should now automatically boot into an OS. 14. When loaded, go to your C:\ drive and delete the “Win7boot.vhd” file. And that’s it, you’re back to where you started. Thanks again HackOr and Mrgroovy! Microsoft put out a video and in it they don’t use “select” but “sel” i tried it your way in the RC (7100) but it didn’t work until i used microsoft’s way…. just thought some might want to know… OK my question is will this step work if I have XP PRO, Vista 32, Vista x64 as dual boot? I have a 1.5TB drive and creating partitions all on this drive no other drive attached. I have installed the Windows 7 RC non *.VHD and boy it messed up my boot order and I had to wipe and reinstall and painful process. Can you let me know if this will work when I get to last step installing Vista x64 again. Thanks for your technical writing on this topic and I would like this to work for me. BTW I have tried vistabootpro tool to fix it the first time around and i was only able to boot into WIN7 not Vista or XP. I am sure others have experienced this as well. Thanks, Mrdancemachine With standard Hard Drives, you can normally pull 90 MB/s with 7200 RPM drives which is the most common drive in PC’s today. Most notebooks use 5400 RPM drives and they pull anywhere from ~30-40 MB/s where modern Flash drives depending on the memory can perform anywhere from 1MB/s to 30MG/s. What really kills you however on Flash drives is WRITE IO operations. Personally, if it’s just for a portable OS, I think a flash drive is a good option. It’s small, portable and you dont need to worry about dropping it. If it’s a home box however being used regularly… It might be a bit slow. Here’s some good reading on the very topics from one of my favorite sites: http://is.gd/1WNYd/tomshw Please keep us updated on what you do and your experience! I’m interested in trying Windows 7 on my own system. But I currently have Windows XP, so is it possible to install Windows 7 to (one of) my drive(s) in the same way, without risks too? Note, however, I do NOT want to have to format my whole system just for trying to use a different OS. I backup as much as possible, but just restoring all programs alone would be a huge hassle. So should I forget about it or can I simply do it no problem? Cause I also heard someone mention that you probably get driver-issues. But I thought, wouldn’t one OS simply use one set of drivers and the other its own? And also, would you get issues with DirectX, being 9 in XP and 10 or 11 even in Windows 7? I also don’t know if the main hardware like the motherboard and CPU and such are supported though. This system is an older Pentium 4, so there you go… But I’d really like to try Windows 7, if not for this system, just to get used to it for the next one I’ll finally buy. Greetings. Comment Name * Email *
Δ Save my name and email and send me emails as new comments are made to this post.


