In this guide, we’ll walk through the basic steps that apply to most scenarios. Then, we’ll discuss some troubleshooting and alternate methods, in case the simple approach doesn’t work for you. Note: Once you master the steps to boot your computer from a USB or CD/DVD, you can use this to boot other operating systems or bootable live environments on your machine.
BIOS vs. UEFI: What’s the Difference?
Each computer, whether it’s a Dell, HP, Acer or even a custom-built system, is an island unto itself before Windows 10 (or some other operating system) starts. Since the 1980s, hardware vendors have worked together to standardize around common access routines and commands for managing your BIOS Boot Options. The BIOS, which stands for Basic In Output System, is a critical bit of low-level code stored in nonvolatile memory that your computer uses to manage your hardware and load Windows 10 or another operating system. A new standard called UEFI or Universal Extensible Firmware Interface came online a decade ago and became the standard for new PCs and devices preinstalled with Windows 8 or later. UEFI offers more advanced options than BIOS, with support for features such as a graphical user interface and mouse support, making it easier to configure boot and hardware settings. UEFI also supports recent security standards required by Windows 10 and previous releases such as Secure Boot, which maintains the integrity of a computer’s state and prevents malicious code from compromising your system at boot time. After decades of systems using BIOS, malware has become more sophisticated, where it is even possible for malicious code to easily infect key operating system code such as the Master Boot Record.
How to Access Your BIOS or UEFI Setup Screen
Because of the variety of brands and configurations, and the ongoing revisions to these systems, this article is not exhaustive. That said, the following provides a comprehensive list of common methods for booting into the BIOS or UEFI firmware interfaces. To enter the BIOS, you need to press a certain key or combination of keys while your computer is booting up. Usually, your window to do this is very brief—you have to press the button when the splash screen with the manufacturer’s logo is displayed. If it seems like your computer boots too fast for you to get a chance to hit the button, you may need to disable fast startup. Here is a list of the common functions or commands for loading the BIOS. Please note, your BIOS screen might display a hint to indicate the appropriate function key for loading the firmware. Start your computer then proceed to strike the appropriate key or command to load the BIOS. After loading the BIOS or UEFI, connect your USB media or connect the DVD install media.
Navigating BIOS / UEFI Setup
Each BIOS or UEFI looks different and works differently, but most share basic principles for navigation. For menu-driven BIOS or UEFI interfaces, your keyboard’s arrow keys are used to access and enter menus. The settings for configuring boot options are sometimes hidden under submenus, which you will have to navigate using these keys.
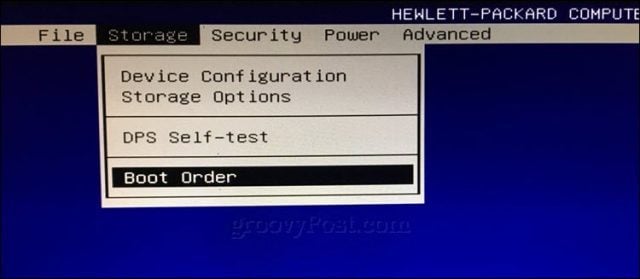
On my HP desktop, the option for changing the system’s boot order is located under Storage > Boot Order. On my other computer, an HP Elitebook, the boot order is called Boot Options located under the System Configuration tab, which uses a graphical interface. So, the experience will vary depending on the system you are using; even if they are the same brands. Navigate through these interfaces by browsing and looking for logical labels that might suggest what you are looking for – storage, boot, disks, etc.
How to Change the BIOS / UEFI Boot Order to Boot from a USB / CD Drive
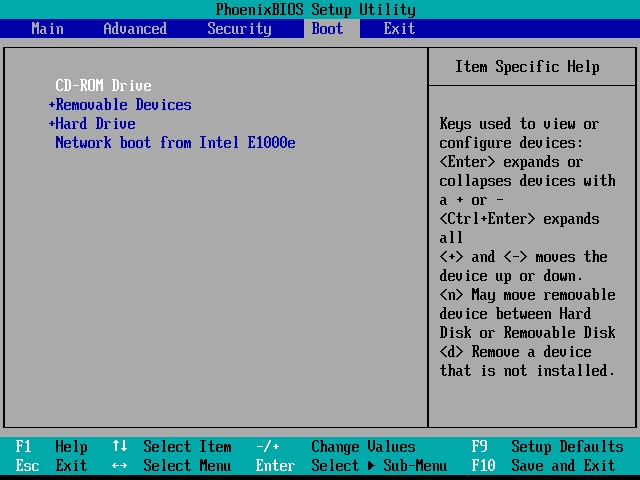
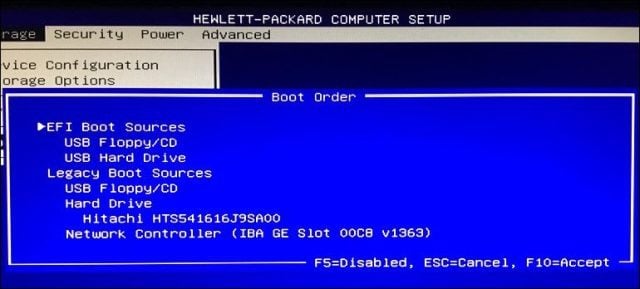
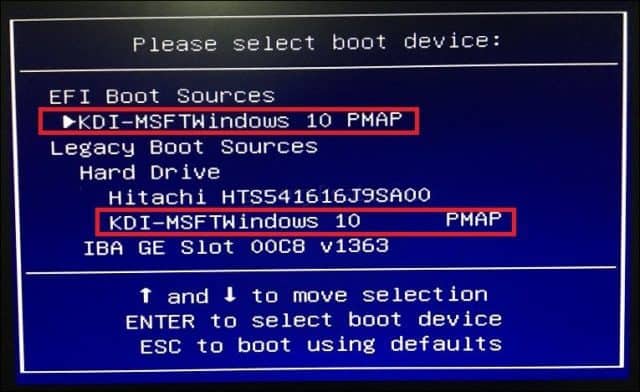
Once you’ve found the Boot Order menu, the interface will present menus displaying the structure of your boot order. Boot order determines which devices your computer will try to boot from first, second, etc. when you turn it on. Most often, your first boot device is your hard disk or SSD containing Windows 10. You can also have your DVD, CD, or USB thumb drive, set as the first boot device without it affecting Windows 10 loading into main memory. If you have a removable storage device set as your first boot device the BIOS will check if there is any attached removable storage as part of POST (Power On Self Test). If a USB thumb drive or DVD is detected, the system will prompt you to boot from it before loading any existing operating systems on the local disk.
Moving through the options will require using the arrow keys. If you don’t see your connected USB device listed, choose the USB storage listed under EFI or Legacy sources. Use the down arrow key to navigate to the selection; some older BIOS interfaces will require using function keys such as F5 and F6 to navigate up and down the boot order. After selecting the appropriate option, you will need to confirm these changes; pressing F10 will usually save them. If not, read the on-screen instructions, which will identify the appropriate function key for saving or accepting changes.
Booting from a USB drive or CD/DVD
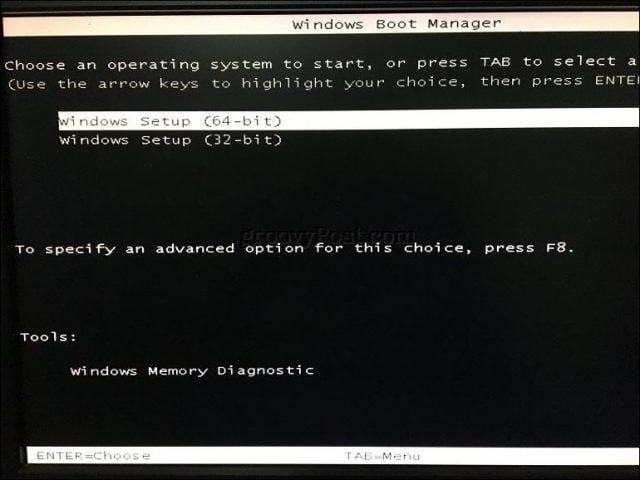
Once the desired option has been selected and confirmed, depending on the type of installation media you are using, you might see different options. USB media will immediately boot into a Windows Boot Manager, prompting selection of the architecture of Windows 10 – 32 or 64 bit – you would like to install.
If you are installing from DVD media, Windows 10 setup will prompt you to hit any key on your keyboard to load setup.
From there, you should be home-free. As long as you created your bootable installation media correctly, the on-screen instructions should guide you through the rest of the process.
Troubleshooting Boot Options
Some systems might encounter problems when attempting to boot from removable media. If you are following the steps above to a T and you’re still having issues, look into some of the items below.
Accessing the UEFI setup page on a Microsoft Surface device. The steps for accessing the BIOS / UEFI page on Surface devices are a bit different. See the steps below for Setting Up UEFI on a Microsoft Surface.Changing UEFI settings on an out-of-the-box Windows 8 or Windows 10 device. For computers that you buy with Windows 8 or Windows 10 pre-installed, it may be tricky to access the UEFI / BIOS. See the steps below for Configuring UEFI on Windows 8 or Windows 10 Computers.What about Mac? Apple computers support installing Windows, but they don’t have a BIOS / UEFI setup page like your typical PC. See our section on installing Windows on a Mac below.Make sure the bootable media was created properly. Boot issues can sometimes be attributed to how the install media was configured or prepared. For instance, on UEFI-based systems – systems designed for Windows 8 or later – preparing the install media, if downloaded from the Microsoft software page, will require using the Microsoft Media Creation Tool or a third-party utility such as Rufus.Enable Legacy Boot Sources. If you are installing on an older computer using BIOS, selecting the option under Legacy Boot Sources or Legacy USB will let you start Windows setup from a USB or CD drive.Disable Secure Boot. Security technologies included in UEFI such as Secure Boot can be a blocker and prevent the system from booting external storage sources. Disabling Secure Boot, temporarily—normally accessible under the security menu or tab—will often resolve this.Disable Fast Startup. If you are unable to access the BIOS, you may need to disable Fast Startup, if it is enabled.Resetting BIOS settings. Some BIOS / UEFI setup screens have a factory reset option. This can sometimes be a quick fix but proceed with caution. If you have your drive BitLocker encrypted with TPM enabled, this may make your existing system drive unusable. OF course, this is a non-issue if your goal is to reinstall your operating system from scratch.
Disabling Fast Startup
If you are attempting to load the firmware on a computer already running Windows, this might prove difficult because of the Fast Startup setting that might be enabled. Fast Startup was first introduced in Windows 8 as a way to make Windows start quicker after shutdown by caching key pieces of operating system code. If you are experiencing problems loading your BIOS or UEFI or changing your boot order, start Windows then turn off Fast Startup.
Boot Device Menu / Boot Override
Some computers will let you press a function key that takes you to a direct menu where you can immediately choose, which volume: USB thumb drive, SD Card, external hard disk, local disk or optical media you would like to boot from. Dell and HP systems, for instance, will present an option to boot from USB or DVD after striking the F12 or F9 keys respectively. This boot device menu is accessed once you’ve already entered into the BIOS or UEFI setup screen.
Here is a list of commands for accessing the direct boot menu on popular brands:
Microsoft Surface and Modern Windows 10 Devices
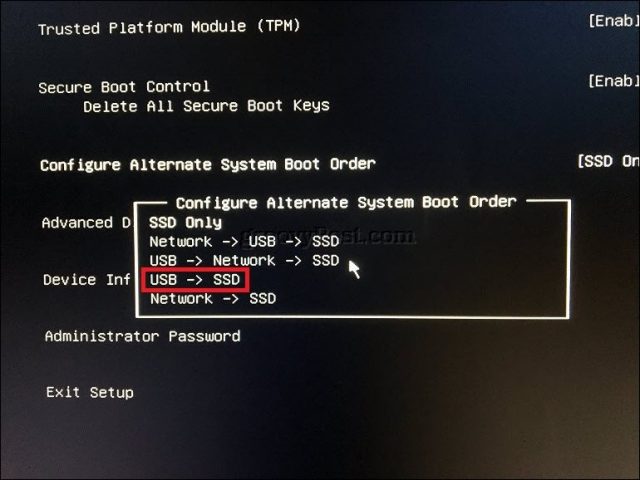
The Microsoft Surface uses its own unique interface for booting into the UEFI firmware interface. First, you need to access your BIOS / UEFI setup utility on your Surface. The Surface uses a combination of text-driven interface, touch, and mouse input to modify boot settings. Navigate down to the option Configure Alternate System Boot Order using the down arrow key. Hit the Enter key, which will load a submenu; use the up and down arrow to select the first boot device then hit Enter.
Navigate down to the Exit setup menu, hit Enter, use the left or right arrow keys to select yes then hit Enter.
Configuring UEFI on Windows 8 or Windows 10 Computers
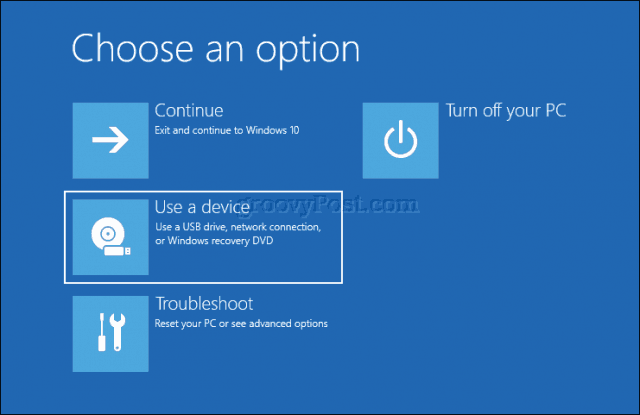
If your computer or device is already running an existing version of Windows 8 or Windows 10, you might be able to initiate booting from removable storage from within the operating system. Click Start > Settings > Update & security > Recovery. Then, under Advanced startup, click Restart now. If this option is not available, sign out of Windows 10, then hold down the shift key, click the Power menu, then click Restart. Continue to hold down the shift key then wait until the Recovery environment is loaded. The Choose an option menu lets you access and boot from removable media attached to the system.
If you need to access advanced boot options, click Troubleshoot, then click the UEFI Firmware Settings to make further changes.
What About Mac?
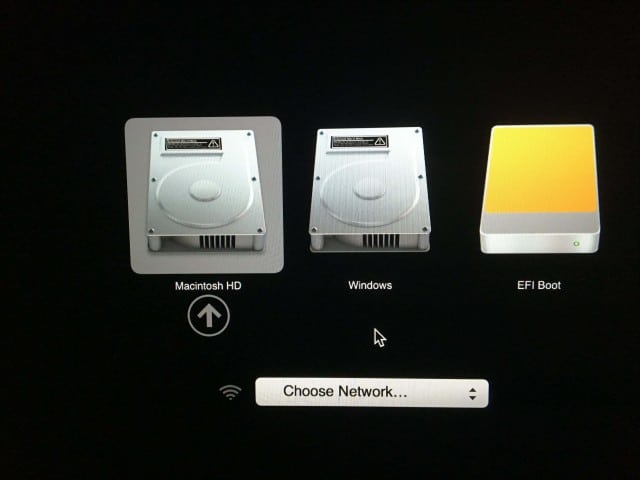
For the past 10 years, Apple Intel-based Macintosh computers have supported Windows. Most Macs will allow you to boot from a CD by pressing and holding C on startup. Booting an operating system other than OS X or macOS from a USB drive is a little more involved. We previously covered preparing your Mac for installing Windows 10 using the Boot Camp wizard in macOS. After preparing your boot camp partition and install media, booting from it is as simple as holding down the Option key before you hear the startup chime.
Conclusion
One of the lessons users will learn from this is that not all computer configurations are alike, even if they are from the same brand. Hopefully, reading through this guide has given you enough background knowledge about the process to help you configure your particular system, or at least ask the right questions if you run into trouble. Let us know what you think in the comments. If you don’t see your specific computer model or make described in this article, let us know so we can find it for you. Now that very large (e.g., 128 and 256 GB) thumb drives are available, how about a related article on how to create a bootable thumb drive as a backup for a currently functioning Windows 10 system…in case the system’s hard drive or ssd drive fails. Assume that the user never had a Windows 10 installation CD because the system either came with Windows 10 already installed or was upgraded via the (now expired) free upgrade program. Thanks, Mike Thanks for reading! Glad you enjoyed the article. Good, bad news on your question. Saving articles as PDF files here at groovyPost is possible however only those who donate or support the blog have the feature available. You can read more about it here: https://www.groovypost.com/support-us/ The program helps support our small community here at gP. Thnx, -S groovyPost.com My current furball is a 5-year old laptop with a tiny 20GB SSD plus a boot drive with 5 partitions. Cloning that Win 10 / UEFI mess to a replacement drive when the boot drive has quite a few bad sectors is thoroughly non-trivial! The steps above are a definite help. I have experienced a viral spyware attack in which they, whoever that is, started to delete files from my windows 10 hard drive before my very eyes. I immediately shut off my 2 pc’s. They contain files valuable to me which I want to preserve. My strategy to recover from this attack is to boot up with Linux from a usb drive. Then create a clone image of the hard drive and store that on an external hard drive purchased for this purpose. I would then convert the machine to 100% Linux hopeful that I will prevent further attacks. So my first question, “Is this a good strategy?” However in attempting to boot from the usb I find myself blocked. I click F2 on the load and it shows only one boot option, windows on the hard drive. I am using a Dell Inspiron. So I click on the reset options button and up pops a nice list of options with USB first. So I click on USB, enter the three lines of information including a reference to the live Ubunta USB flash drive I intend to use, and up pops a single line containing the USB directive at the end of the line, but at the beginning is the hard drive again. They are together as single choice. Clicking on F12 during startup shows a boot list with only one option, the hard drive. So I am guessing that whatever file contains the boot options has been maliciously altered. I have been researching the above and must say the situation is complex. Any good suggestions anyone? Thanks hopeful Thanks! I try to boot from the USB key. The UEFI Bios not recognize the USB booting. Is only show my 2 hard drives. How to setup the bios to recognize my USB key ? Thank you Claude. If that is so, there are several solutions. I suspect that your question should have been posted here https://forum.groovypost.com. One solution is to create a boot USB drive like System Rescue CD (use rufus to burn the ISO to your flash drive) then use the instructions in the article to boot the computer and do a boot repair. Do you mean you have burned the ‘Install Files’ (from an .iso file/what’s on an installation disk) onto an SD card? ” I want the computer to start and run off of the SD card and … ” “I set the BIOS boot order to have the computer boot from the SD card, but it then wants me to install the operating system onto another disk.” Are you trying to use the SD card like you would a faster USB Flash Drive in a “Windows-To-Go” type of setup? You were supposed to be able to change the boot order on a temporary basis. I booted from a bootable DVD (Acronis Recovery environment), and the BDDVDRW CH30L drive did show up under the UEFI devices, second after Windows Boot Manager. (My two other nonbootable USB drives also showed up under Legacy devices.) I used the arrow keys to navigate to the BDDVDRW device and pressed Enter to select it. It started up just fine, and I was able to use the Recovery Software on the disk to look at the USB drives and list which backups were available. Then I opened the BDD tray, put in another bootable disk I wanted to take a look at, and restarted the computer. When I pressed ESC, then F9 to go into the Boot Options Menu, the BDDVDRW drive no longer shows up—only Windows Boot Manager. I have tried going into Windows and back out, etc. Nothing seems to work to make the BDDVDRW listed again! Belarc Advisor reports that Secure Boot is still disabled, so nothing has changed there. Any ideas on why the menu has changed? Or how I can enable the device to come up before Windows Boot Manager as a permanent option? Thanks for any advice. Whenever there is a semi-annual major update, I like to recreate the flash drive so I don’t have to download so many updates after the installs. I have found that many flash drives fail for no particular reason. The MCT will fail at the end of the process without any explanation. Doing internet searches I found information saying that this could happen if there is a MBR present on the flash drive, so I started removing all the partitions before running MCT. This has been OK so far on a good quality flash drive (Patriot), but it seems to have caused a problem on some less expensive flash drives. A couple have failed completely, a couple more just will not work with the MCT even after deleting all the partitions. These drives work for all other purposes. So, I decided to get a SD card reader (I got a Kingston reader that has always worked great for me at home). This lets you plug a uSD or SD or both cards into the reader, and then you plug the reader into a USB port. I tried using the MCT, but it again gets a failure at the end with no explanation. I downloaded the newest version of Rufus, and set it up for UEFI using a Windows 10 ISO I downloaded using the MCT. This worked perfectly on one of the cheap drives that previously failed using the MCT. However, when I use the SD card and reader in exactly the same way, tested on a Dell PC, it does not recognize the SD card as UEFI, but only as Legacy. I had this same issue when I tried a slightly older version of Rufus. It seems it works properly on a real flash drive, but not quite on an SD card. Any ideas on how to get a UEFI boot to work using an SD card? Could this be caused by the Kingston card reader? Comment Name * Email *
Δ Save my name and email and send me emails as new comments are made to this post.


![]()
